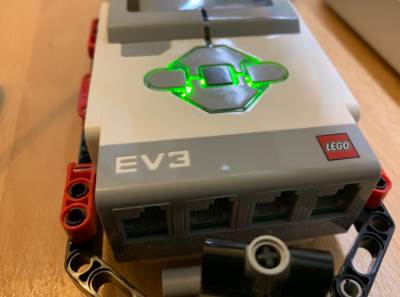
The Lego MINDSTORMS EV3 buttons can be used as an input device for a robot or a simple program running on the EV3 Brick. They can be used within a program like sensors to detect when a button is being pressed. Some uses for the buttons are:
- Answering questions on the screen
- Calling specific actions on a robot, e.g.:
- Making a motor turn to move the robot
- Pausing execution of the current logic (or exiting a loop)
- Both of the above – have your robot ask a question and answer the question using the buttons. Based on the answer call an action within your program.
In this post we will take you through all you need to know about the EV3 buttons and we’ll also include 2 great step by step example projects/ programs that will utilize the buttons in different ways. These programs will hopefully help in sparking more ideas on how you could use the brick buttons in your EV3 project.
What does the EV3 Brick Button Programming Block Look Like?
There’s a couple of options when it comes to the EV3 Brick buttons and programming blocks within within the Lego MINDSTORMS EV3 software (or app). There is a Button block within the yellow (sensor) palate:
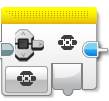
This block has 2 modes:
Measure | Brick Buttons
This mode will output the ID of the button which is currently pressed:
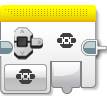
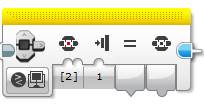
Compare | Brick Buttons
This mode allows us to check the state of a button or multiple buttons (pressed, released or bumped) and compare them:
Other Button Related Blocks
We can also access them via the following orange flow control blocks:
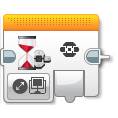
Wait Block: can be used to wait for a button to be pressed. This block will pass the button number that was pushed so we can identify the actual button:
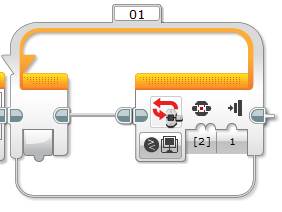
Loop Block: the brick buttons can be used to break (exit) a loop or this block can monitor for a specific button to be either released, pressed or bumped (these actions are outlined further below).
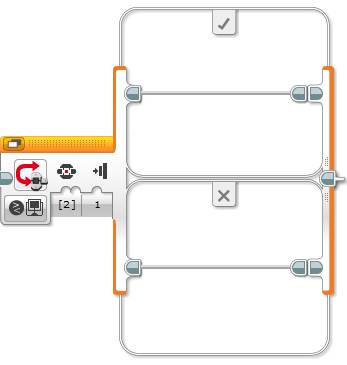
Switch Block: this block can be used to check if specific buttons have been pressed (released or bumped).
What Buttons on the EV3 Brick Can be Programmed?
The following 5 buttons on the EV3 Brick can be accessed from within the Lego MINDSTORMS programming app or programming software. The back button is not accessible from a program.
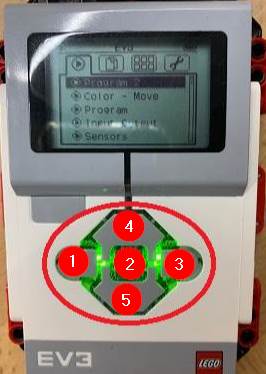
Even though the buttons are not labelled, the arrangement of them makes their function fairly self explanatory:
- Left
- Center
- Right
- Up
- Down
Can I detect when 2 or more EV3 Brick buttons are pressed at the same time?
Unfortunately not, the Lego MINDSTORMS EV3 programming software will detect only one button being pressed at one time.
Are the Brick Buttons and Lights the same?
Even though they are close together on the Lego EV3 Brick, the buttons and status lights are two different things. The status lights are controlled via the green status light programming block and can be controlled independently to the brick buttons.
If you would like to know more about the Status Lights, see our post here where we drill into the Status Lights in detail.
How to reference the EV3 Brick Buttons within a Program?
Whether using the loop, switch or wait blocks, the brick buttons are referred to via numeric IDs within a program. The following list outlines the number ID and its corresponding button:
- Nothing
- Left
- Center
- Right
- Up
- Down
Note the option of “nothing” which is 0 – this equates to no brick button being pressed, released or bumped.
What is the Difference Between Pressed, Released and Bumped?
There is an extra input named State when using the brick buttons on the following programming blocks / modes:
- Switch Block: Compare mode
- Wait Block: Compare mode
- Loop Block: Brick buttons mode
The State input allows us to select one of the following events:
- Pressed
- Released
- Bumped
Pressed
The pressed event is triggered when a button is pressed and held (i.e. it does not need to be released). It is relevant to all buttons (1 through 5). When the button is pressed this event will be True.
Released
The released event is triggered when we let go of a button (i.e. pressed and then released). It is relevant to all buttons (1 through 5) and when the button is released this event will be True.
Bumped
The bump event will be triggered when a button is pressed and released in one action. It is relevant to all buttons (1 through 5).
Example EV3 Project 1: Guessing Game
There’s no robot build needed for this example project, just the EV3 brick. So it’s a good one if you are short on time within a classroom environment. In this program we will have the code pick a button and then wait for us to guess which button has been picked by pressing our “guess” button. It will then let us know if we got it right or wrong.
Program logic:
- Generate a random number between 1 and 5 and store it within a variable named Button.
- Prompt the user to press a button (i.e. take their guess)
- Wait for a EV3 button to be pressed (bumped)
- Check to see if the guess matches the button within the Button variable ( from step 1)
- Display the results on the screen (Correct or wrong)
Now we have the logic down, lets create the program by opening a new program within the Lego MINDSTORMS Software and following the steps below:
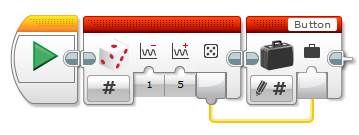
- Generate a random number between 1 and 5 and store it within a variable:
- Generate number:
- Drag and drop a red Random block next to the start block
- Set its Upper Bound input (max value) to 5
- Store number into a new variable:
- Drag and drop a red Variable block next to the Random block
- Click the variable name field (top right):
- Click Add Variable
- Enter the name Button and click OK
- Wire the Value output from the Random block into the Value input of the Variable
- Generate number:
- Prompt the user to press their guess button:
- Drag and drop a green Display block next to the Variable block and set its:
- Mode to Text | Grid
- Font (aA) = 1
- Text = Which Button am
- Drag and drop a green Display block next to the Variable block and set its:
- Mode to Text | Grid
- Clear Screen = False
- Y = 2
- Font (aA) = 1
- Text = I thinking about?
- Drag and drop a green Display block next to the Variable block and set its:

- Wait for a button to be pressed (i.e. the guess) and compare the pressed button to the generated value in the ‘Button’ variable:
- Wait for a button to be pressed:
- Drag and drop an orange Wait block:
- Set its mode to Brick Buttons | Change | Brick Buttons
- Drag and drop an orange Wait block:
- Read the saved Button variable:
- Drag and drop a red Variable block next
- Set its mode to Read | Numeric
- Drag and drop a red Variable block next
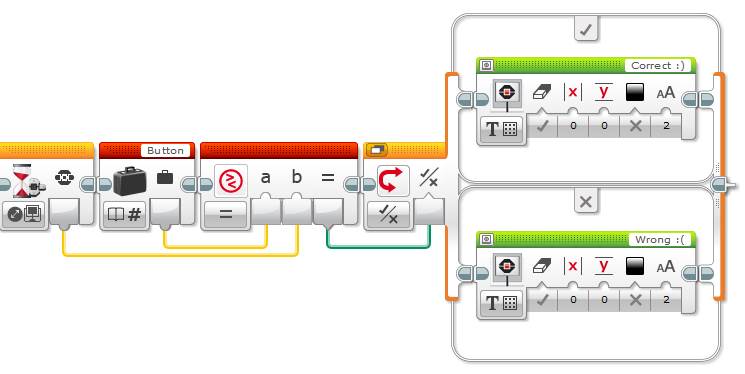
- Check to see if the guessed button matches the button variable:
- Drag and drop a red Compare block after the variable block
- Wire the read Variable output into the A input
- Wire the wait block’s button ID into the B input
- Drag and drop a red Compare block after the variable block
- Compare the result:
- Drag and drop an orange Switch block next
- Set its mode to Logic
- Wire the Compare block’s output into the Switch block’s logic input
- Drag and drop a green Display block into the true section of the switch:
- Set its mode to Text | Grid
- Set the text to: Correct 🙂
- Drag and drop a green Display block into the false section of the switch:
- Set its mode to Text | Grid
- Set the text to: Wrong 🙁
- Drag and drop an orange Switch block next
- Wait for a button to be pressed:
- Display the final results for 5 seconds:
- Show the value that the EV3 Brick generated:
- Drag and drop a green Display block after the switch block
- Set its mode to Text | Grid
- Set Clear Screen to False
- Set Font to 1
- Set Y to 2
- Set Text to: I picked:
- Drag and drop a green Display block after the switch block
- Read the variable Button value (to show it on the screen after the text above):
- Drag and drop a red Variable block after the switch block
- Set its mode to Read | Numeric
- Set the text to Wired
- Drag and drop a green display block onto the end
- Set its mode to Text | Grid
- Wire the Read Variable block into the text input
- Set Clear Screen to False
- Set Font to 1
- Set X to 10
- Set Y to 2
- Drag and drop a red Variable block after the switch block
- Show the guessed button value:
- Drag and drop a green Display block to the end of the program
- Set its mode to Text | Grid
- Set Clear Screen to False
- Set Font to 1
- Set X to 0
- Set Y to 4
- Set Text to: You Picked:
- Drag and drop a green Display block to the end of the program:
- Set its mode to Text | Grid
- Set Clear Screen to False
- Set Font to 1
- Set X to 11
- Set Y to 4
- Set Text to Wired
- Wire the text input from the orange Wait block
- Drag and drop a green Display block to the end of the program
- Show the value that the EV3 Brick generated:
Congratulations, you’ve written a guessing game program! The full program should look like the picture below (note: click the image to view a larger and clearer version):

Example EV3 Project 2: Prompt and Response – Move a Robot with the EV3 Buttons
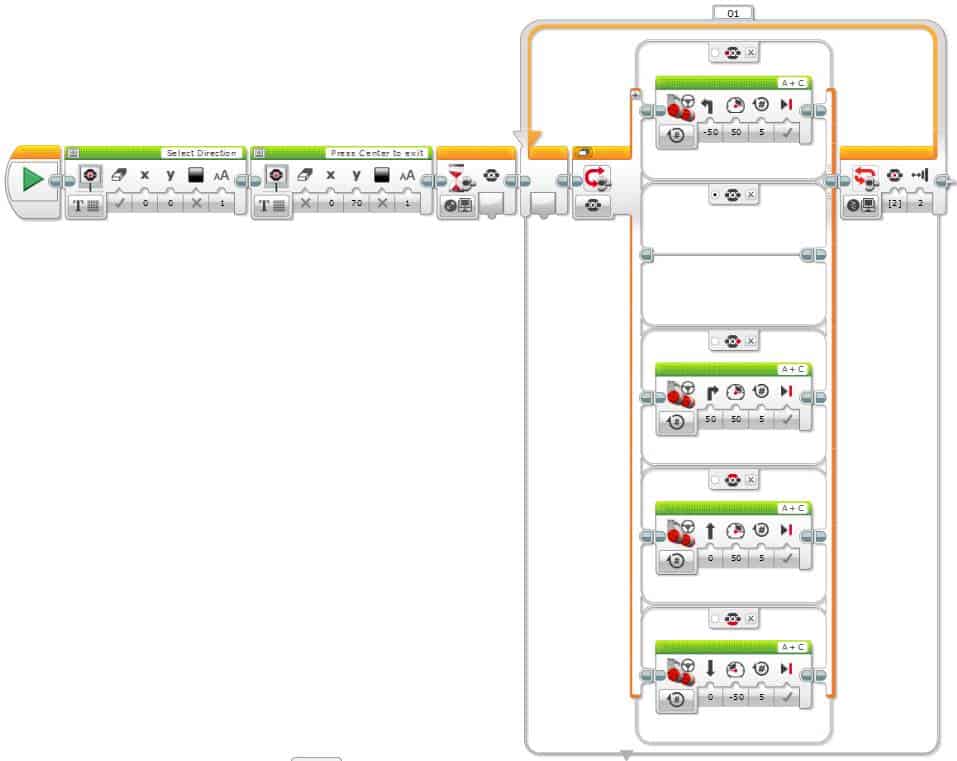
In this the second example project we create a program which will move the Lego EV3 robot in the direction of the pressed button:
- Up = Forwards
- Down = Backwards
- Left = Turn left
- Right = Turn rigt
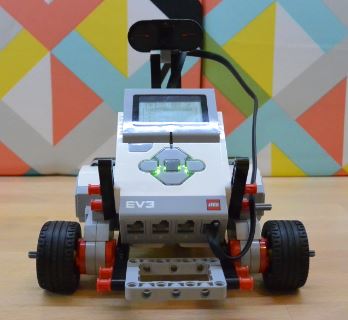
In terms of a robot build for this program, I recommend the Explor3r. It’s a quick and easy to assemble and can be built with either the Education and Home Lego Lego MINDSTORMS kits.
The build instructions can be found here.
Program Logic:
- Display instructions on screen
- Wait for a button to be pressed (bumped)
- Move the direction of the pressed button for 5 motor rotations
- Loop program waiting for the next button to be pressed
- Exit / end the program when the center button is pressed
Let’s start the program:
- Display the instructions on the screen:
- Display “Select Direction”
- Drag and drop a green Display block next to the start block
- Set its mode to Text | Pixels
- Text Size (Aa) to 1
- Set the Text to Select Direction
- Drag and drop a green Display block next to the start block
- Display “Press center to exit”
- Drag and drop a green Display block next to the start block
- Set its mode to Text | Pixels
- Text Size (Aa) to 1
- Clear Screen to False
- Y to 70
- Set the Text to Press Center to exit
- Drag and drop a green Display block next to the start block
- Display “Select Direction”

- Wait for a EV3 Brick button to be pressed and set up the program loop:
- Wait for a button to be pressed:
- Drag and drop an orange Wait block to the end of the program:
- Set its mode to Brick Buttons | Change | Brick Buttons
- Loop the program until the center button is pressed:
- Drag and drop an orange Loop block next to the Wait block
- Set its mode to Brick Buttons | Brick Buttons
- Set Brick Button ID to 2
- Set State to 2
- Drag and drop an orange Loop block next to the Wait block
- Drag and drop an orange Wait block to the end of the program:
- Wait for a button to be pressed:

- Move the robot in the appropriate direction:
- Drag and drop an orange Switch block inside the loop block
- Set its mode to Brick Buttons | Measure | Brick Buttons
- The default top switch case should be the Left button (turn left):
- Drag and drop a green Move Steering block into the case
- Set Steering to -50
- Set Power to 50
- Set Rotations to 5
- Drag and drop a green Move Steering block into the case
- The default bottom case switch should be None
- Set the Default Case to this case. If you are unsure how to do this, see our Switch Block post here.
- Add another Case statement to the Switch and set it to the Right button (turn right)
- Drag and drop a green Move Steering block into the case
- Set Steering to 50
- Set Power to 50
- Set Rotations to 5
- Drag and drop a green Move Steering block into the case
- Add another Case statement to the Switch and set it to the Up button (move forward)
- Drag and drop a green Move Steering block into the case
- Set Steering to 0
- Set Power to 50
- Set Rotations to 5
- Drag and drop a green Move Steering block into the case
- Add another Case statement to the Switch and set it to the Down button (move backwards)
- Drag and drop a green Move Steering block into the case
- Set Steering to 0
- Set Power to -50
- Set Rotations to 5
- Drag and drop a green Move Steering block into the case
- Drag and drop an orange Switch block inside the loop block
That’s it, Hit the download and play button to test. The complete program should look like the following (click the image to see it full size).
Feel free to leave a comment if you run into any issues or have any other suggestions for EV3 posts.
