
I’ve been programming in the enterprise space for a little over 20 years and to me the most basic thing to do within a program is to store information which can be reused or assessed later in the program’s logic. In just about any programming language we do this by creating and using a variable.
What is a programming variable? A variable is a storage location for data which we give a name within a program. The name provides a way of labelling the data so that we can better understand its purpose within the program’s logic.
In this tutorial we’ll cover how to set, read and use variables within Lego Mindstorms EV3 programming software.
Types Variables within EV3 Programming Software
Before we create a variable we need to determine what type of data we are going to store within it. This is because a variable can only store a single data type and once that data type is set, it cannot be changed. For example if a variable is created as a numeric data type, it can only store numeric data and not alpha characters.
It’s also worth mentioning that although we cannot change the data type of the variable once it’s set, we can change the data within the variable at any time in the program. Also if a variable is written to multiple times, only the last value is saved (that is unless we are adding to an array).
The table below outlines the types of variables available within the Lego Mindstorms EV3 Programming software along with examples:
| Variable Type | Description | Example |
|---|---|---|
| Text | Stores alphanumeric characters | This whole sentence including numbers can be stored 1234 |
| Numeric | Stores a number | 10001 |
| Logic | Stores a boolean value i.e. True or False | True |
| Numeric Array | Stores a list of numbers | 1, 2, 300, 40, 3 |
| Logic Array | Stores a list of True / False values | True, True, False |
How to Use Variables in Lego Mindstorms EV3
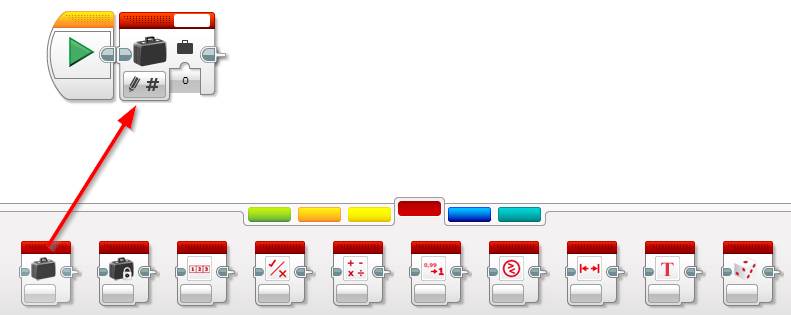
We can use variables within the Lego Mindstorms EV3 software by utilising the red Variable block. The Variable block is the first red block on the left hand side:
Using a variable is quite simple as there are only three things we can do with a variable:
- Define the variable
- Write data to the variable
- Read data from the variable
We’ll cover how to do each of these things below and we will go through the steps to write a program covering each of these steps which will store the output of a maths equation and reads it to display the result on the EV3 Brick screen.
Creating a Variable
Before we can use a variable within a program we need to define it first. Once it’s defined we can then write and read from it – the Lego Mindstorms EV3 Programming software will only allow us to pick from the defined variable list when we need to read or write to them.
Follow the steps below to define a new numeric variable named “Equation Value”:
- Create a new program
- Drag and drop the red Variable block next to the Start block (as per the image above).
- Update its mode to Write | Numeric
- Click the Variable selector box in the top right and click Add Variable

- Give the variable a descriptive name:
- Within the New Variable window type SumValue and click Ok

Congratulations – you have create a variable! The variable block should now show our new variable name in the top right:

Note: As per step 2 when creating a variable ensure the appropriate data type is selected within the Variable block’s mode before adding it. The variable will be created as this selected data type.
Write Data to the Variable
Now we have created the variable it’s time to write some data to it. To write data to the Variable block its mode needs to be set to Write along with the variable type. For example, if we need to write to a numeric value the mode will be:
Write | Numeric
Continuing on from the program in the previous section, let’s add two numbers together and save the result into our new variable:
- Insert a Math block in between the start block and the variable block

- Update both a and b inputs to any number of your choosing.
- I’m going to do 210 + 5:

- Set the variable by wiring the result of the Math block into the Variable block:
- Ensure the Variable block‘s mode is Write | Numeric
- Drag the equals sign (=) from the Math block over to the input on the Variable block:

Congratulations you have now written to a variable! Follow on to the next section where we will read the result and display it on the EV3 Brick’s display.
Read Data from the Variable
Once a variable is set we’ll need to read it at some stage within our program. To read a variable the Variable block’s mode must be Read along with the variable type. For example reading a text variable the mode would be set to:
Read | Text
Continuing on from the program we have written in the previous two steps, let’s read the variable:
- Drag and drop a red Variable block at the end of the program:
- Set its mode to Read | Numeric
- Select the “SumValue” variable from the variable name list

Continue onto the next and final section to display the result on the EV3 Brick’s screen.
How to Display a Variable on the EV3 Brick Screen
Displaying a variable is done with the green Display block. The important thing to remember is to set the Display Block’s text control to Wired (as per the first step below). This tells the Display block to show the result from the variable rather than show preset text.
Continuing on from the program above, we will display the result of the “Sum Value” variable we created in the first step.
- Set up the Display block:
- Drag and drop a green Display block to the end of the program
- Set its mode to Text | Pixels
- Click the word Mindstorms in the top right an choose Wired
- Drag and drop a green Display block to the end of the program

- Wire the display:
- Drag the Value input from the Read Variable block into the Text input of the Display block

- Set a wait timer so that the value is displayed on the screen for 5 seconds:
- Drag and drop an orange Timer block to the end of the program
- Set its Time input to 5

Click the Download and Run button to see your program in action! If you used the same numbers as I did above, you should see the result (215) on the screen.
The full program should look the the image below:

How to Remove a Variable from a Lego Mindstorms EV3 Program
What if you have accidentally created a variable and you want to remove it from the program? It’s not very intuitive at first, but once you know how to delete a variable it’s a breeze. In the example below I’ve got a variable named “MyOldVariable” that I wish to remove:
- Click the Spanner button to the left of the first Program tab

- Select the Variables tab

- Select the variable you wish to remove and click Delete

How to Change a Variable Type within EV3 Software
The only way to change the variable type once it has been created within the Lego EV3 Software is to delete the variable (see steps above) and recreate it with the required data type.
Example Program: Show Color Name on EV3 Brick Display
Here’s one more example program which is a good example of how to use and implement variables within a Lego Mindstorm EV3 program. Using the Color Sensor it will detect a color and display the color it has selected on the EV3 Brick’s display.
Let’s start up the Brick and plug the color sensor into port 3 and get started:
- Create a new Text Variable named ColorName
- Drag and drop a red Variable block next to the Start block
- Update its mode to Write | Text
- Select Add Variable from the variable selector on the top right of the block
- Type ColorName into the New Variable prompt and click Ok

- Add a wait to wait for the center button to be pressed:
- Drag and drop an orange Wait block next to the Variable block
- Update its mode to Brick Buttons | Compare | Brick Buttons
- By default the center button (number 2) will be selected

- Add a Switch block to detect the color and set the ColorName variable:
- Drag and drop an orange Switch block next to the Wait block
- Update its mode to Color Sensor | Measure | Color
- Add a Case for each available color


- Write the color to the ColorName Variable:
- Starting back on the Black case statement, drag and drop a red Variable block into the Case
- Set its mode to Write | Text and select ColorName from the variable selector on the top right
- In the Value input type Black
- Repeat the steps above for each color case statement – changing the text for each of course 🙂 .

- Read the Variable for displaying it on the screen
- Drag and drop a red Variable block to the end of the program
- Set its mode to Read | Text and select ColorName from the variable selector on the top right
- Display the Variable value on the EV3 Brick’s display
- Drag and drop a green Display block next to the variable read block
- Set its mode to Text | Pixels
- Click the word Mindstorms in the top right an choose Wired

- Wire the Read Variable block into the Display block
- Drag a wire from the Value input on the Read Variable block into the Text value of the display block

- Add a wait bock to display the value on the screen for 4 seconds
- Drag and drop an orange Wait block to the end of the program
- Set its value to 4

And you are done! Select the download and run button to run the program. Once it’s running place the color sensor just above an object and press the centre button – the object’s color should be displayed on the screen.
The final program should look like this:

Feel free to leave a comment if you have any questions.