

The Lego Mindstorms EV3 Touch sensor has a couple of applications in the world of robotics. At a high-level it can be used to:
- Detect an object or barrier
- Initiate program logic when its state changes (i.e. pressed, bumped or released)
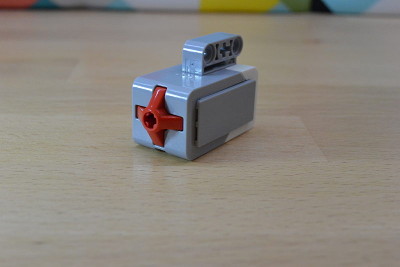
The Touch sensor’s default port on the Lego EV3 Brick is port number 1 and its programming block is available from the yellow sensor palette:

How does the EV3 Touch Sensor Work?
Like a light switch completes its circuit when the light is turned on, the Lego Mindstorms EV3 Touch sensor works in the same way i.e. it uses a circuit to detect the button being pressed. When the button is pressed it completes the circuit and when it’s in the default state (i.e. released) the circuit is broken.
Once the circuit is connected (i.e. the button pressed) the sensor sends an electrical signal back to the EV3 Brick to tell it that the button is pressed. When the button is then released (i.e. the circuit broken) it registers a bump and a release.
EV3 Touch Sensor Modes
The EV3 Touch sensor has two modes:
Measure State
The Measure state mode outputs the current state of the Touch sensor. There are only 2 states in which the sensor can be in this mode: True or False:
- True = Pressed
- False = Released
Compare State
The Compare state mode allows you to test or monitor the EV3 Touch sensor for a specific state. In this mode there are 3 states available:
- Released (default)
- Pressed
- Bumped (i.e. pressed, then released)
This mode returns True or False, True will be returned once the value in the State input is detected from the Touch sensor.
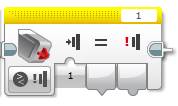
The State input for this mode can either be selected from the drop down on the block itself or wired in from a variable (or another source in the program). The State input accepts the following values from 0 to 2:
| State | Value |
|---|---|
| Released | 0 |
| Pressed | 1 |
| Bumped | 2 |
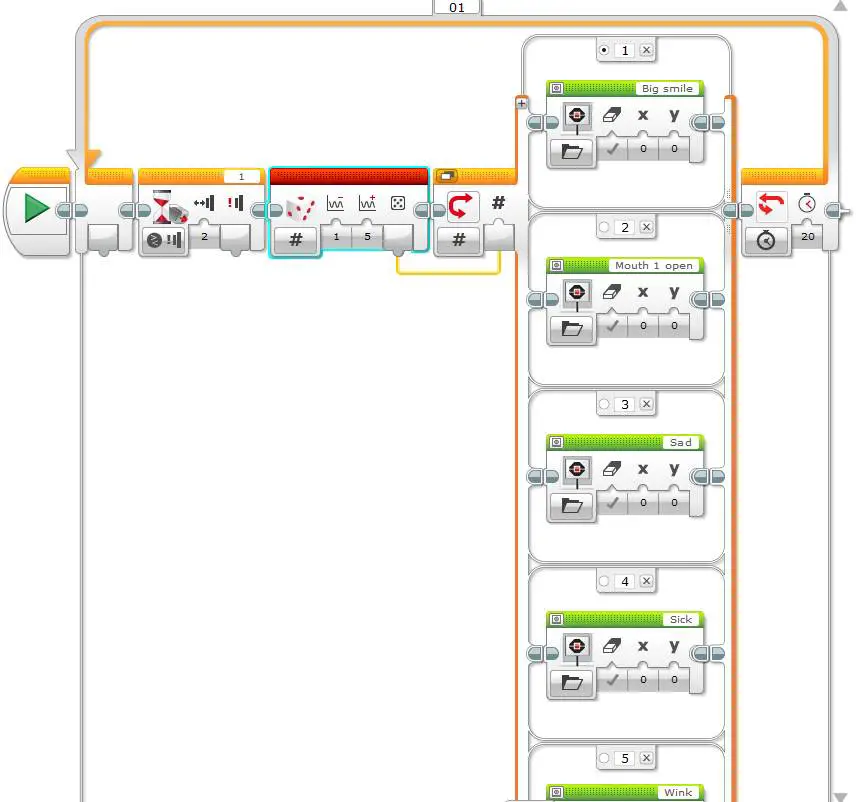
Example EV3 Touch Sensor Program 1: Random Face
In the first example program we will use the Touch sensor to initiate logic within a program. When the Touch sensor button is pressed the program will do the following:
- Generate a random number between 1 and 5
- Use a switch to display a face on the EV3 brick’s display depending on the random number’s value
- Repeat this process for 20 seconds
There’s no complicated build required for this program, just plug the Touch sensor into port 1 and follow the steps below:
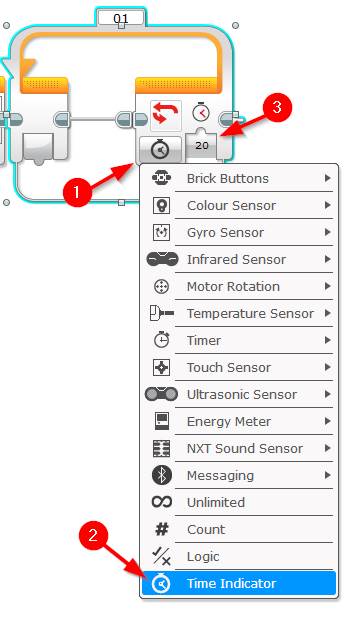
- Create a 20 second loop:
- Drag a drop an orange Loop block next to the Start button
- Set its mode to Time Indicator
- Set the Seconds input to 20
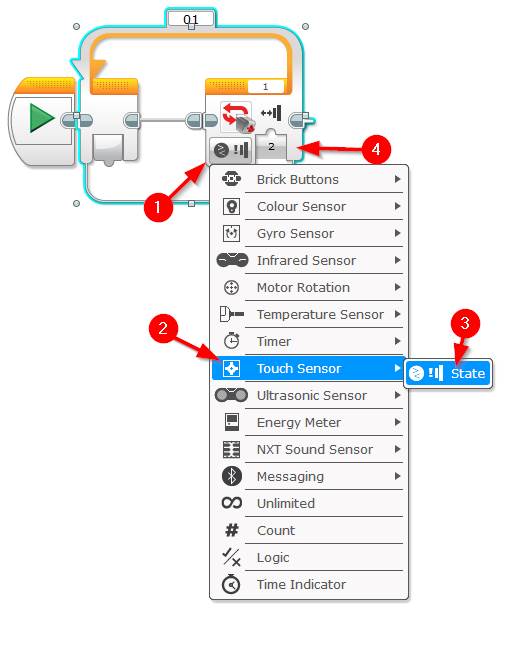
- Add logic to wait for the Touch sensor to be pressed.
- Drag and drop an orange Wait block inside the Loop
- Set its Mode to Touch Sensor | Compare | State
- Set the State input to 2 (bump)

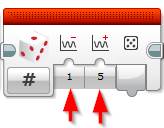
- Create a random number
- Drag and drop a red Random block next to the Wait block
- Set the lower Bound input to 1 and the upper bound input to 5
- Add a switch to assess the random number and display a face
- Drag and drop an orange Switch block next to the Random block
- Set its Mode to Numeric
- Wire the Random block into the Switch block by dragging the value output over to the Number input of the Switch block

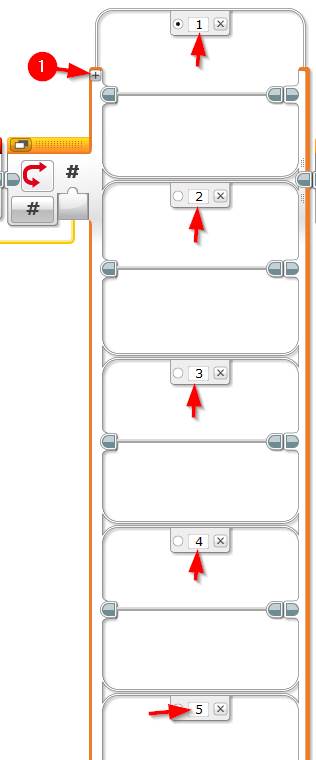
- Add 3 more case statements to the Switch block (to match the random number which can be between 1 and 5):
- Click the + button on the Switch block to add a new case
- Repeat 3 times
- Renumber the case checks from 1 to 5
- . Add the display blocks to display a different face in each case within the Switch block:
- Drag and drop a green display block into Case #1
- Click the image selector on the top right and from the LEGO Image Files\Expressions folder select an expression
- Repeat these 2 steps for each Case.
- I chose the following for my program:
- 1 = Big Smile
- 2 = Mouth 1 Open
- 3 = Sad
- 4 = Sick
- 5 = Wink
- I chose the following for my program:
That’s it, you are done. Hit the Download and run button and test out the program by watching the display change by pressing the touch sensor button.
The full program should look like the image below:
Example EV3 Touch Sensor Program 2: Start and Stop Robot
For the second example program we will use the Touch sensor to stop the robot moving . For this program I recommend using the Explor3r robot build, it’s simple and can be made using either the retail or education Lego Mindstorms EV3 kit. It’s instructions can be found here. Feel free to build the touch sensor bumper on the front – it will work well with this program, stopping the EV3 robot once it hits something.
The logic for this program is fairly straight forward:
- Start the robot moving forward
- When the button is bumped stop the robot
Let’s get started:
- . Create a loop which exits once the Touch sensor button is bumped:
- Drag and drop an orange Loop block next to the start button
- Change it’s exit logic to Touch Sensor | State
- Update the State input to 2 (Bump)
- Start the robot moving forward:
- Drag and drop a green Move Steering block inside the loop
- Set its mode to On
- I’ll leave it’s default speed and direction (forward at 50% speed)

- Stop the motors when the Touch sensor button is pressed
- Drag and drop a green Move Steering block outside of the loop
- Set its mode to Off

That’s it you are done. Click download and run button to test out the program with your robot. Once the button is bumped (pressed and released) it will stop the robot.
Example EV3 Touch Sensor Program 3: Change Direction on Bump
For the last example program we will move the robot forward and once the EV3 Touch sensor is bumped, we will reverse the direction of the robot. As with Example program number 2, I recommend the Explor3r EV3 Robot build which can be found here.
The logic for this program is a little more complicated than the last one:
- Set up a logic (true / false) variable named ‘Direction’
- When the button is pressed invert the variable (i.e. if it’s true make it false and vice versa)
- If the Direction variable is True move backwards, if it’s False move forwards.
Lets get started:
- Set up the Direction logic variable:
- Drag and drop a red Variable block next to the start block
- Set its mode to Write | Logic
- Using the variable selector in top right of the block click Add Variable
- Type Direction for the variable name and click Ok
- Add an infinite loop:
- Drag and drop an orange Loop block to the right of the variable block
- Leave it’s exit condition as infinite (or set a timer if you wish to have it run for a set time)
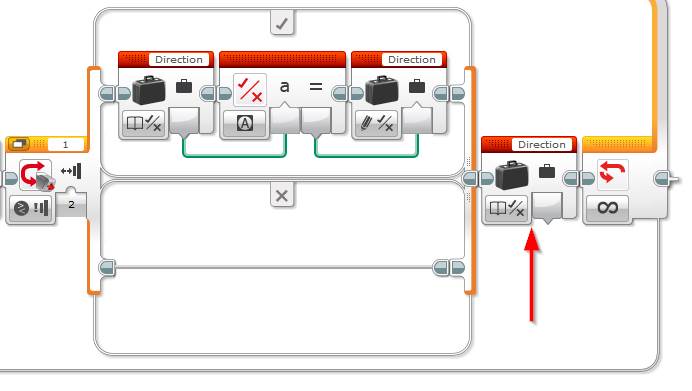
- Add a check for the button being bumped:
- Drag and drop an orange Switch block inside the loop
- Set its mode to Touch Sensor | Compare | State
- Set the state input to 2 (bumped)

- Set the Direction variable when the button is pressed:
- Drag and drop a red Variable block into the True condition (tick) of the Case block.
- Set its mode to Read | Logic
- Select the Direction variable from the variable selector in the top right.
- Drag and drop a red Logic Operations block next to the variable block.
- Set its mode to Not
- Wire the read Variable block into the Logic block
- Drag and drop a red Variable block to the right of the Logic block.
- Set its mode to Write | Logic
- Select the Direction variable from the variable selector in the top right.
- Wire the Equals output from the Logic block into the Write Variable block

- Read the Direction Variable
- Drag and drop a red Variable block to the right of the switch block (but still inside the loop)
- Set its mode to Read | Logic
- Select the Direction variable from the variable selector in the top right.
- Move the motors forwards or backwards
- Drag and drop and orange Switch block to the right of the read variable
- Set its mode to Logic
- Wire the Read Variable block into the switch block
- Reverse: Drag and drop a green Move Steering block into the True (tick) part of the switch and set its mode to On and its Power input to -50
- Forward: Drag and drop a green Move Steering block into the True (tick) part of the switch and set its mode to On and its Power input to 50

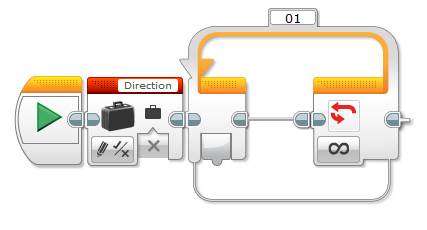
Congratulations you are done. Hit the download and plat button to test out the program. Your EV3 robot should move forward and when the Touch sensor is pressed, it will move backwards, press it again it will move forwards.
The whole program should look like this:
