
Getting into Lego MINDSTORMS EV3 can be a little overwhelming at first. There’s a lot to learn, particularly if you are new to programming and robotics. In this getting started guide, I hope to cover everything you need to get up and running quickly and more importantly have some fun along the way. Cause if it’s not fun, why do it right?
Below is a list of things we need to do to get started. I’ve linked them to each section within this post, so feel free to skip over some steps if you have already completed them.
- Install the Lego Mindstorms Programming Software
- Connect the computer / programming software to the EV3 Brick
- Build a robot
- Quick overview of the programming interface
- Write a program
Install the Lego MINDSTORMS EV3 Programming Software
The first step to getting the Lego MINDSTORMS EV3 programming software up and running is to decide on which software edition to use. There are two versions available:
- Home Edition
- Focused on the Home version of the Lego MINDSTORMS EV3 kit. It’s lobby has links to build some of those awesome bots that have been created by Lego.
- Education Edition
- Focused on the Education (or core set) of the Lego MINDSTORMS EV3 kit. More classroom focused and contains some additional advanced programming blocks when compared to the Home Edition.
Both Editions are suitable and compatible with either the Home or Education editions of the Lego MINDSTORMS EV3 kit. If you have the Home kit, then I recommend installing the Home edition if you are just starting out, otherwise go for the Education edition (which will give you some more advanced blocks). In fact I have both installed on my PC and they seem to run happily side-by-side.
The final decision to make when it comes to the software is what hardware or device are you going to be running it on. Lego has got you covered, no matter what platform you have:
- Lego MINDSTORMS EV3 Programming App
- Lego MINDSTORMS EV3 Programming Software
Note that the programming App does not contain the full set of programming blocks that are available within the Software version. The App contains only the basic blocks and it does not have the yellow sensor blocks, blue advanced blocks and red data operations blocks. Based on this, I’d recommend sticking to the PC, Mac or Chromebook version of the software.
We have written a post on installing the Lego MINDSTORMS app and programming software on all these devices. If you would like detailed instructions on the installation process, see our post here.
Connecting the Lego EV3 Brick to a Computer (or tablet)
There’s two ways the Lego EV3 Brick can be connected to a computer:
- Via a USB Cable
- Via Bluetooth
If you are using a tablet, then Bluetooth is the only option. If you are using a PC/ Max then I’d recommend using Bluetooth if it’s capable. It’s a lot simpler and hassle free as there’s no cables involved. Also on a lot of the robot builds the USB port on the EV3 Brick is not readily accessible. If your machine does not have Bluetooth, then I would recommend purchasing a cheap Bluetooth dongle like this one on Amazon. At the time of writing this it’s $6.99 USD.
Connecting to the Lego EV3 Brick via USB Cable
To connect the Lego MINDSTORMS brick via USB:
- Turn on the EV3 Brick
- Connect the micro USB cable into the PC port located on the top of the EV3 Brick
- Connect the other end into the PC / Mac.
And that’s it, your’re done.
Connecting to the Lego EV3 Brick via Bluetooth
Connecting via Bluetooth takes a little more configuration but it’s well worth it. This process only ever needs to be done once, i.e. unless your computer changes or the EV3 Brick is reset back to default settings:
- Turn on the EV3 Brick
- Check the EV3 Brick to see if Bluetooth is turned on:
- If there’s not a small Bluetooth symbol in the top left corner of the screen, turn it on:
- Select the Settings (Spanner) option on the top right
- Scroll down and select Bluetooth
- Click Ok (centre button) on the Checkbox to enable Bluetooth.
- If there’s not a small Bluetooth symbol in the top left corner of the screen, turn it on:
- Ensure Bluetooth is turned on your computer and that the computer is discoverable:
- For Windows:
- From the Menu select Settings (the small cog on the left hand side)
- Select Devices:
- For Windows:

- Ensure Bluetooth is switch On and leave this screen open to stay discoverable.

- Now to connect the EV3 Brick to the computer:
- On the EV3 Brick select the Settings (Spanner) option on the top right
- Scroll down and select Bluetooth
- Press Up button 4 times and select Connections
- Select Search
- When the search finishes, scroll down to select your computer name and select Connect
- Select the Checkbox to confirm the connection
- Lead the passkey as the default (1234) and select the checkbox
- Back on your computer, enter the passkey of 1234
The EV3 Brick will make an audible beep as it connects, select the checkbox on the EV3 brick to confirm.
Reconnecting the EV3 Brick to the Software via Bluetooth
If you have chosen to connect via Bluetooth and the Lego EV3 Brick is not turned on when the programming software is loaded, then you will need to manually refresh the software to connect / pick up the EV3 brick. To do this:
- Turn on the Brick (I know this is very obvious but I thought I better make sure).
- Within the Lego MINDSTORMS EV3 Programming software, click the Refresh button within the Brick status window located on the bottom right:

- Once the search has finished, it should show your EV3 Brick in the grid. Click on the Bluetooth checkbox to connect

The EV3 Brick should now be connected.
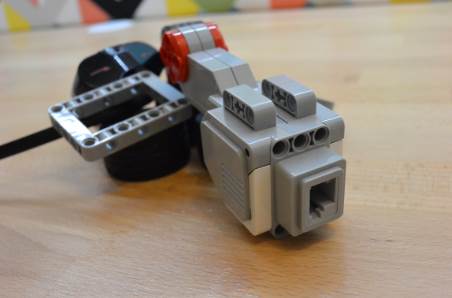
Build a Lego MINDSTORMS EV3 Robot
Now the software is installed and the Lego EV3 Brick is connected to the computer it’s time to build a robot. I’d recommend starting with the Explor3r, it’s a quick a simple build that will only take 20 minutes. It’s also compatible with both the Education and Home Lego MINDSTORMS kits.
The build instructions can be found here.

Don’t worry about adding the touch sensor or color sensor attachments onto the robot for now, we just need the base robot for this exercise.
Overview of the Lego MINDSTORMS EV3 Programming Software Interface
Before we get to the final (and my favourite) step – programming the robot, lets start with a quick overview of the Lego MINDSTORMS programming software interface.
Upon opening the application you will be presented with the lobby. What’s available within the lobby will be determined by which version you have (Home or Education) :
- Home: Links to user guide and robot builds
- Education: Links to education kit robot builds and tutorials
Lets open a new project and check out the interface:
- Select File | New Project
This is the same in both versions.
Tip: Clicking the + tab to the right of the Lobby tab is a shortcut for creating a new project.
The picture below outlines the programming interface:

- Programming Blocks
- Programming Block Palettes
- EV3 Brick Information
- Download and Run the program on the robot
- Programming Canvas (drag and drop programming blocks to create the program)
- New Program
- New Project
Program 1: Move the EV3 Robot Forwards and Backwards
For the first program let’s start with the most basic thing we need to do, and that’s make the robot move. We’ll make a program to move the Lego EV3 robot forward and then back to its original starting position.
The program logic will be very simple:
- Move the robot for 3 seconds forwards
- Move the robot for 3 seconds backwards
Let’s get started:
- Move the robot forwards:
- Drag and drop a green Move Steering block next to the start block

- Set the motors to run forwards for 3 seconds (or what ever time you see fit):
- Update the Mode to On for Seconds
- Set the Seconds input to 3

Note: leaving the power input at the default of 50 tells the motor to move forward at half power. Setting it to -50 tells the motor to go backwards at half power.
- Move the robot backwards for 3 seconds
- Drag and drop another green Move Steering block next to the other one.
- Set its mode to On for Seconds
- Set the Power input to -50 (backwards)
- Set the Seconds input to 3

Make sure the EV3 brick is on and connected to the Lego Mindstorms EV3 software, if so, hit the Download and Play button to give your program a try.
Program 2: Spin the Robot in a Circle
For the last program lets spin the EV3 robot on the spot left and then right:
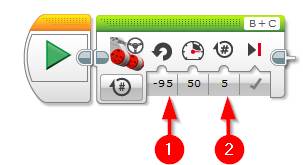
- Spin the Robot to the left:
- Drag and drop a green Move Steering block next to the start block
- Set its Steering input to -95
- Set the rotations input to 5
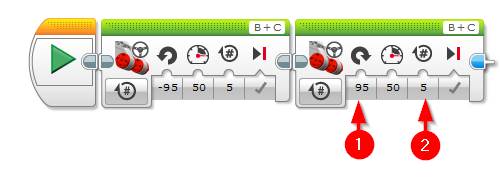
- Spin the Robot to the left:
- Drag and drop a green Move Steering block next to the start block
- Set its Steering input to 95
- Set the rotations input to 5
If you would like to know more about the Move Steering block and see some more advanced programs, then click here to read our post which covers everything from turning to moving until the EV3 Robot detects an object.
Feel free to leave a comment if you have any questions.