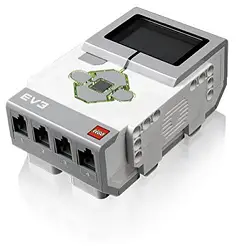
The Lego Mindstorms EV3 Intelligent Brick is the heart (or more so the brains) of your robot. It’s made up of a display screen, internal speaker, 8 ports, LED lights and 6 buttons. Apart from being the controller of your robot it also provides the power to run the motors and sensors.
For such a small device there’s a lot going on and in this article I cover the basics and common questions asked about the EV3 Brick.
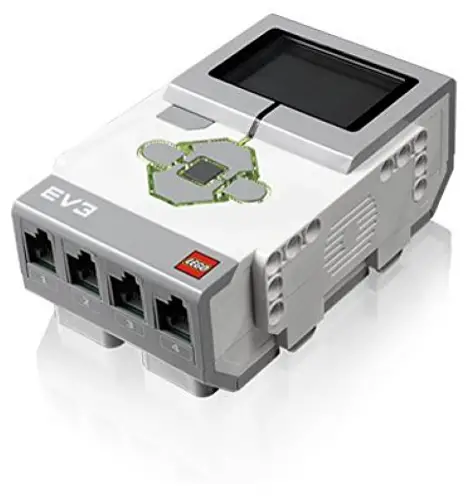
Ports
There are 5 ports on the top and another 4 ports on the bottom of the EV3.
Top
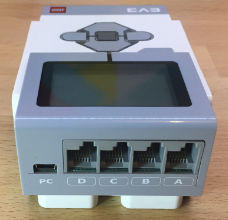
The 4 x RJ12 ports on the top of the Brick are used only for the Motors and they are labelled A through to D. The other port marked PC is used to connect the EV3 Brick to your computer (PC or Mac).
If you are writing a program without the EV3 Brick connected to the computer, or no motor(s) plugged in, the Programming App/ EV3 Software will assume the following port mapping is being used:
- Port A = Medium Motor
- Port B and C = 2 x large motors
- Port D = Large Motor
If the Brick and motors are connected, then the Programming App / EV3 Software will automatically assign the ports according to how they are connected.
Bottom
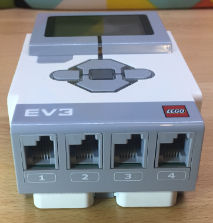
The 4 x RJ12 ports on the bottom of the Brick are used for connecting sensors and are labelled 1 through to 4.
If you are writing a program without the EV3 Brick connected to the computer, or no senor(s) plugged in, the Programming App/ EV3 Software will assume the following port mapping is being used:
- Port 1 = Touch Sensor
- Port 2 = No Sensor
- Port 3 = Color Sensor
- Port 4 = Infrared Sensor
If the Brick and sensors are connected, then the Programming App / EV3 Software will automatically assign the ports according to how they are connected.
Display
The Display is used to show us the Brick’s user interface. Via this
For example, we may show a smiley face or a sad face if a program falls into a particular block of logic, or provide text-based feedback depending on certain variables within a program.
The display screen’s layout is made up of a the following components:
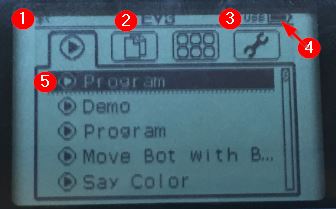
- Wireless Connection Status Icons (this includes both wifi and Bluetooth)
- Brick Name
- USB connection Status: If USB is displayed,
then it’s connected to another device via USB - Battery Level
- Available Programs
Is the Display a Touch Screen?
Buttons
The 6 buttons on the EV3 Brick are used to navigate through the menu options. The buttons are fairly
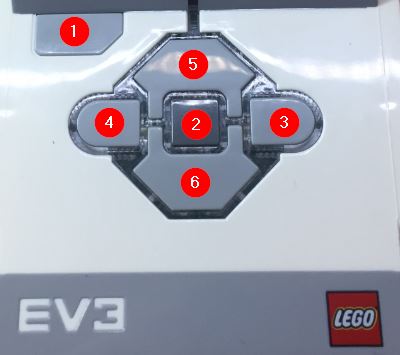
- Back – this is used to navigate backwards or exit a running program or
shut down the device. - Center – it’s the ‘OK’ button and is used to select the currently highlighted option.
- Right – Used to navigate through the menu options.
- Left – Used to navigate through the menu options.
- Up – Used to navigate through the menu options.
- Down – Used to navigate through the menu options.
The EV3 Brick Status Lights
The EV3 Brick’s status lights surround the buttons and they have 3 different colors:
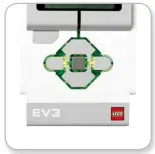
Green 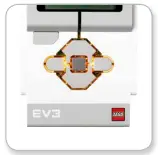
Orange 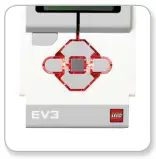
Red
The status lights serve 2 purposes:
- To show the current status of the brick (status codes)
- They can be programmed to show and or pulse one of the 3
colors to provide feedback when a program is running.
Status Light Codes
The status light codes tell us what the Brick is currently doing and it does this by either pulsing one of the
The following list outlines the status codes:
- Red (solid) = Startup, Updating or Shutting Down
- Red (pulsing) = Busy
- Orange (solid) = Alert, Ready
- Orange (pulsing) = Alert, Running
- Green (solid) = Ready
- Green (pulsing) = Running program
How to Program the Status Lights
The status lights can be programmed using the Green Status Light

Once you have dragged the block into your program, there’s a couple of options you can use:
The Light Globe (mode): Turn the status lights on or off
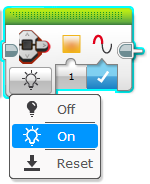
The Reset option will reset the status lights back to their default state – which is a green blinking pattern to indicate a program is running. Note that this default blinking pattern is different to a Green pulse, so it’s still a useful option.
The Color Block: Select the
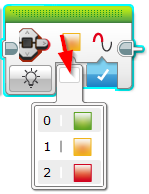
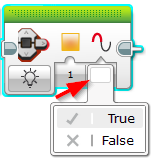
Pulse or Solid: The last option can be used either pulse the status light or leave it solid. If this option is set to True then the lights will pulse. Note that this option is only available if the mode is set to On.
How to Turn it on
To turn on the EV3 Brick press the Center button, the status lights will turn a solid Red and you should see the startup screen which displays: “MINDSTORMS starting….”
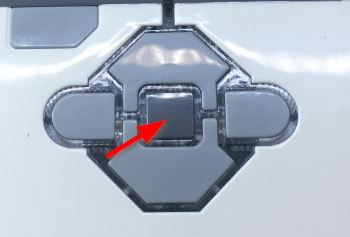
When the status light turns Green the EV3 brick is ready to use.
How to Turn it Off
To turn it off,
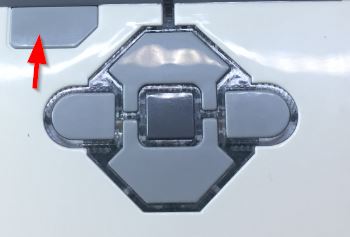
From the
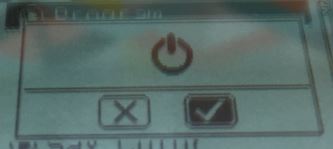
You can abort the shutdown process by not selecting the Accept checkbox and pressing the Center button on the defaulted abort (X) checkbox instead.
Settings
How to check the firmware version
Firstly let’s briefly cover what firmware is: firmware is the low-level software required to control a piece of hardware. It’s typically stored on a piece of internal flash memory and can be erased and rewritten.
To check the current firmware version of your EV3 Brick:
- Select Settings (spanner option on the top right)
- Scroll down and select Brick Info
The Brick Info screen will display the hardware version,
How to update the EV3 Brick firmware
Periodically Lego will release updated firmware to fix bugs and add extra features. To install these updates and upgrade your EV3 Brick’s firmware:
Note: Updating the Firmware will delete all the existing files and projects currently on the Brick. Ensure you have these files backed up on your computer before updating.
- Turn on the EV3 Brick and connect it to your computer via the USB cable (I would not recommend using Bluetooth to do this).
- Open the Lego Mindstorms Program on your computer
- Select Tools | Firmware Update
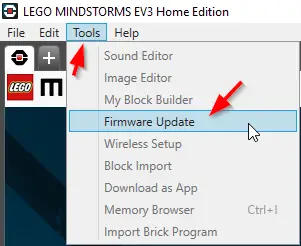
- Click the Check button to check for any new updates
- When the Available Files list is populated, select the most recent version (if available)
- Click the Download button to download and install the selected firmware version to the connected EV3 Brick.
How to change the EV3 Brick’s Name
Changing the EV3 Brick’s name can be done from the Settings area on brick itself:
- Select Settings (spanner option on the top right)
- Scroll down and select Brick Name
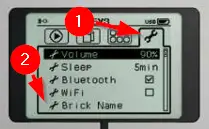
- Click the centre (OK) button
- Use the Left, Right, Up and Down buttons from the onscreen the keyboard to enter the desired name.
- Click the Tick keyboard button to save the new name.
Note: if you do not have a ‘Brick Name’ option, check the firmware version (see
WiFi
WiFi can be used to connect to the Brick via the Ev3 Programmer software (PC or Mac). Note that WiFi is not supported on the EV3 Programmer App (tablet version).
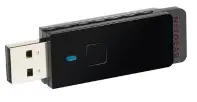
One thing I need to alert you to is that in order to use WiFi, the EV3 Brick needs a WiFi dongle as it’s not built into the Brick itself.
The EV3 does only support WPA2 networks and because of its limited keyboard, the WiFi password must only be made up of upper and/ or lower case letters (no symbols like #).
Purchasing an EV3 compatible WiFi Dongle
The Netgear N150 WiFi USB adapter is officially the only compatible dongle for the EV3 Brick and can be purchased from Amazon here. Although it’s bulky, it is the most reliable.
Connecting to a WiFi Network
First step to connecting to a WiFi network is to enable WiFi:
- Select Settings (spanner option on the top right)
- Scroll down and select WiFi
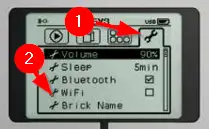
- Click the
center (Ok) button on the checkbox to enable WiFi - Scroll down and press the
center (Ok) button on Connections - The EV3 Brick will now search for and display a list of available networks. Select your network name (or select Hidden Network, if your Wifi is hidden).
- Enter your password (Note that the password can only contain upper and or lower case
letters, and no special charactersdue the keyboard limitations). - Scroll down to the checkbox and click the
center (Ok) button.
Bluetooth
Bluetooth can be used to download and run programs from the EV3 programmer App and the EV3 Programmer software (PC / Mac). Note the EV3 programmer app is a cutdown version of the PC / Mac EV3 Programmer program. It can run on either an iPad or Android tablet.
If you’re using a computer, I would recommend using Bluetooth to connect to your brick as it’s much simpler than connecting the PC cable each time you want to load or tweak a program.
Bluetooth can also be used to daisy chain (connect) up to 4 bricks together. See the section “Can I connect 2 EV3 Bricks together” below for more details on daisy chaining.
How to turn on Bluetooth
- Select Settings (spanner option on the top right)
- Scroll down and select Bluetooth
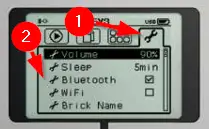
- Click the
center (Ok) button on the checkbox to enable Bluetooth
Note for Apple iOS users: If you are using an Apple device to connect to the EV3 Brick, ensure the iPhone/iPad/iPod setting under Bluetooth is also checked. This will enable the Apple device to see the EV3. When this is turned on other Bluetooth devices like a computer or Android tablet cannot connect to the Brick, only iOS devices.
How to connect via Bluetooth
To connect to a tablet or computer via Bluetooth:
- Select Settings (spanner option on the top right)
- Scroll down and select Bluetooth
- Select Connections
- A screen displaying a list of your favourite Bluetooth devices (selecting one of these will not require a passkey as it’s trusted).
- If the device you wish to connect to is not in the list, select Search
- Once the scan is finished, use the up and down arrows to select the device
- Enter the passkey
- Click the
center (Ok) button.
Power/ Batteries
If you purchased the Lego EV3
If you purchased the retail kit then you’ll need to put 6 x AA batteries into the back of the Brick. These batteries can either be lithium rechargeables or regular alkaline batteries. Please note that it’s recommended that all batteries are the same kind and charge (i.e. never mix old and new batteries).
Purchasing an Additional Lego Battery Pack
Whether you have the retail kit without a battery pack or you would like an additional back up battery – they can be purchased from Amazon.
Click here to get the latest price for a Lego EV3 battery pack.
Click here to get the latest price for a Lego EV3 battery pack charger.
Can I connect 2 Ev3 Bricks together?
Yes this is possible! The process of connecting two (or more) EV3 Bricks together is called Daisy Chaining.
The most common way to do this is to connect them via the USB port or Bluetooth both
Daisy Chaining is set per project and can be enabled from within the project properties page:
- From your project, click the wrench symbol in the top left tab
- Check the Daisy Chaining checkbox just below the project picture.
- Save your project
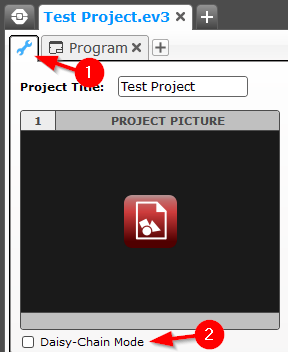
Once this is set you will get a Layer selection box to the left of the port selection box in the top right-hand corner of the programming block. Use this to select the appropriate EV3 Brick to use within the program.
Layer 1 is the first Brick, Layer 2 is the second and so on. Once the Brick is selected continue to program it as normal.
Purchasing Additional EV3 Bricks
If you’re looking to purchase an additional EV3 Brick, click here to check the latest price on Amazon.
Technical Specifications
- Operating System: LINUX
- CPU: 300Mhz ARM9 processor
- Flash Memory: 16Mb
- RAM: 64Mb
- Screen Resolution: 178 x 128 pixels (black and white)
- USB: up to 2.0 (host connection) up to 480Mbit/sec
- Micro SD Card: max 32Gb – Supports SDHC V2
- Motor Ports: 4 x RJ12’s
- Sensor Ports: 4 x RJ12’s
- Power: 6 AA Batteries

Comments
its very nice app