This post is all about the basics on how to detect an object with your Lego EV3 robot. We’ll cover the following:
I’ve packaged the 3 programs outlined within this post into a Lego Mindstorms EV3 Programming Project file that is compatible with both the Home version of the software or the Education Teachers Edition. It can be downloaded here.
Getting Started
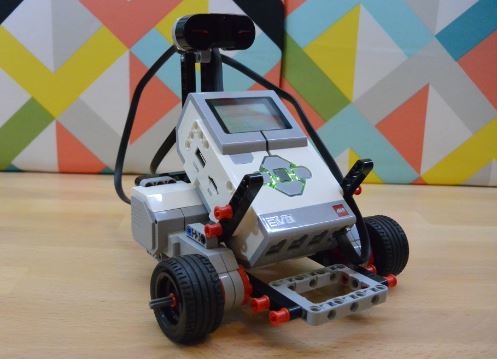
To follow along I recommend building the Explor3r robot. It’s a fast and simple Lego EV3 robot to build and can be built using either the Lego Mindstorms EV3 Education or Retail kit.
The build instructions from robotsquare.com can be found here. Don’t worry about adding the
Lego EV3 Infrared Sensor Vs Ultrasonic Sensor
With a couple of exceptions that I’ll outline, the Lego EV3 infrared sensor and
- Infrared: Sends out an infrared signal and detects the reflection of the signal bouncing off an object with the front (eyes) of the sensor.
- Ultrasonic: Sends out high-frequency sound waves that will bounce off an object and measure how long it takes for the sound to reach back to the sensor. These sound waves are too high for a human ear to hear.
What else can they do?
The ultrasonic sensor’s primary purpose is to measure distances, it does
Whereas the infrared sensor does do a couple of other cool things other than measuring distance:
- Beacon mode: in this
mode it can detect an infrared beacon. It will calculate the beacon’s proximity and heading (angle) based on the signal hitting the sensor. - Remote mode: in this
mode the sensor will detect a button (or a combination of buttons) being pressed on the remote control and then pass that into your program.
Which is Better
When it comes to measuring distance, the Ultrasonic sensor is better as it’s:
- More accurate
- Less susceptible to interference
- Got a larger measuring range – it can measure objects up to 255cm where the infrared sensor can only detect objects up to 100cm.
However, if you would like to control your robot using remote then the infrared sensor is the only one that can do this.
Detecting an Object
Object detection is done using either the ultrasonic sensor or the infrared sensor. As mentioned in the previous section, both of these sensors do basically the same thing but use different technology to do it. What’s that same thing? They both will detect an object and judge the distance from that object.
Before we start to move the EV3 robot, let’s start with an example program that will print out the distance from an object using the
Logic Explained
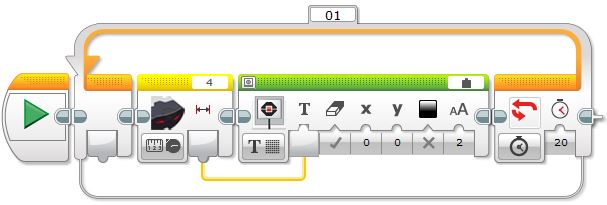
We will start by using the Loop programming block which will continually loop the program around for 20 seconds, and display the number of centimetres an object is away from the sensor.
How To Program It
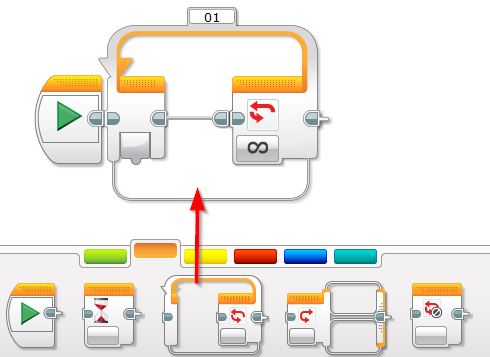
- Drag an Orange Loop programming block to the right of the start block:
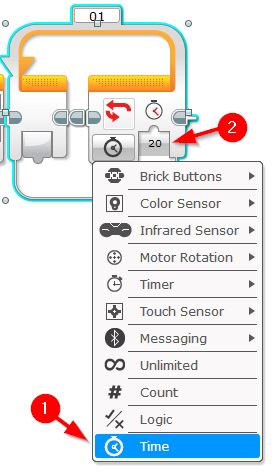
- Change the loop condition from infinate to Time and enter 20 into the time value:
- Drag the Yellow Infrared (or Ultrasonic) sensor block into the middle of the loop block
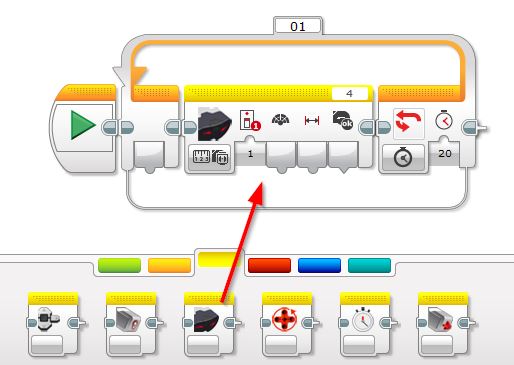
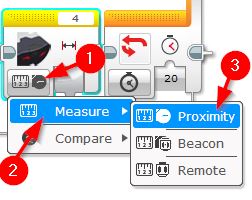
- On the infrared sensor select a mode of Measure | Proximity or if you are using an ultrasonic sensor select a mode of either Measure | Distance Centimetres or Distance Inches.
- Now it’s time to print the distance to the screen. Drag the green Display programming block to the right of the sensor block within the loop.
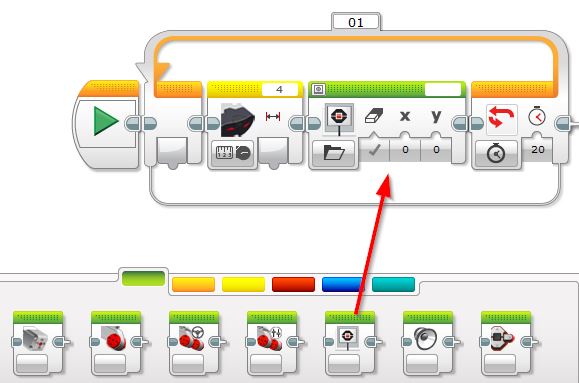
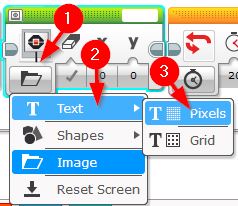
- To get the value we will need to setup the display block for printing text. Select the mode for the Display block to Text | Pixels:
- Change the display value on the Display block from MINDSTORMS to Wired:
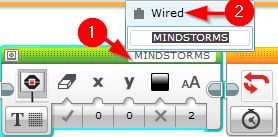
- Now the display block is ready for text, wire in the value from the Infrared \ Ultrasonic block by dragging the output value into the text value of the display block.
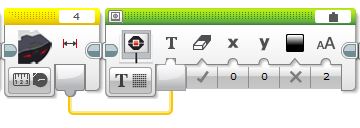
The program should look like the below screenshot (note that I’m using the infrared sensor).
The program is now ready to run! Click the Download and Run button in the bottom right-hand corner to send the program to your robot and test it out.
Move your hand (or any object) up close to the sensor then slowly move it away to see the distance increase on the display.
Stop at Object
Now we know how to detect an object, let’s move the EV3 Robot and stop it once it detects an object is close.
As outlined in our Lego EV3 Movement 101 post we will use the Move Steering programming block to move and stop the robot. You can view this post here.
Logic Explained
To stop the EV3 robot once an object is detected at a certain distance we will use a Loop programming block and a Switch block to continually check if an object is close, if it is we’ll stop the robot, otherwise, we’ll keep the robot moving forward.
How To Program It
- Drag an Orange Loop programming block to the right of the start block:

- Drag an Orange Switch programming block into the middle of the loop:
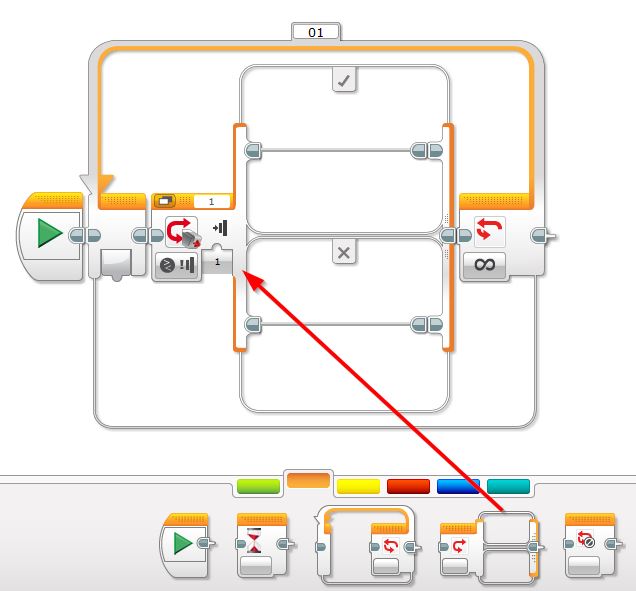
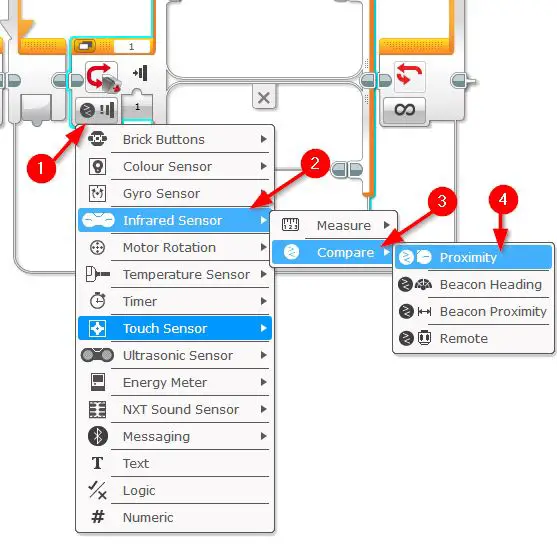
- Next lets set the switch block to check the distance from an object within each loop. To do this change the Switch block’s condition to Infrared Sensor | Compare | Proximity, or if you are using the Ultrasonic Sensor, Ultrasonic Sensor | Compare | Distance in Centimetres (or Inches).
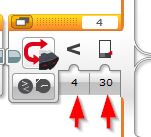
- Set the Switch block’s Compare Type to 4 (Less Than) and set the Threshold value to 30 (feel free to adjust this value to see what works best for your robot):
- Drag a green Move Steering block into the X (False) condition of the Switch block:
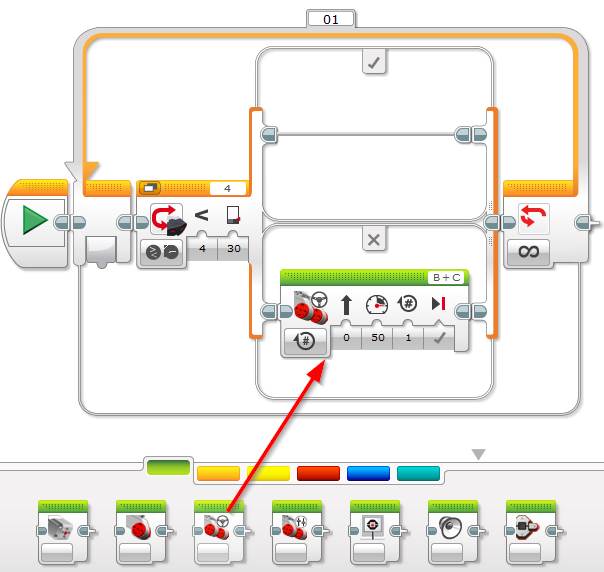
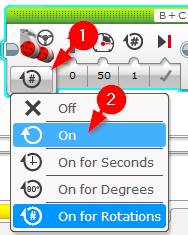
- Set the Move Steering block’s mode to On. This part of the program will keep the robot moving forward as long as there’s no object that less than 30cm away:
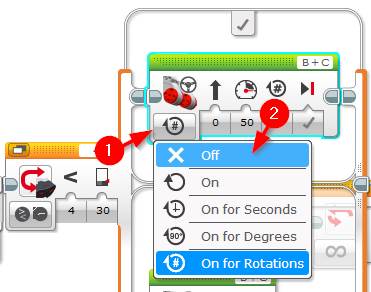
- Drag a Move Steering block into the True (tick) part of the switch block and set it’s Mode to Off. This block will stop the EV3 robot when an object is detected at less than 30cm away:
That’s it, the program is now ready to test. Point your EV3 robot toward a wall and hit the Download and Run button to test it out. Once it stops,
One thing that’s worth noting is that there are many ways to write this type of
Obstacle Avoidance
Now we know how to stop when an object reaches a certain threshold, avoiding the object is a breeze.
Logic Explained
Like stopping our EV3 robot at an object, we’ll use a loop programming block to continually check to see if an object is close and instead of stopping, we will change the robot’s direction to avoid the object.
How to Program It
- Drag an Orange Loop programming block to the right of the start block:

- Drag an Orange Switch programming block into the middle of the loop:

- Set the Switch block’s Compare Type to 4 (Less Than) and set the Threshold value to 30 (feel free to adjust this value to see what works best for your robot):

- Drag a green Move Steering block into the X (False) condition of the Switch block:
- Set the Move Steering block’s mode to On. This part of the program will keep the robot moving forward as long as there’s no object that less than 30cm away:

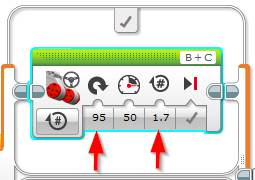
- Drag a Move Steering block into the True (tick) part of the switch block and set it’s Steering value to 95. Also set the Rotations value to 1.7
- The last thing we will do is put a time limit on the program, to do this set the loop condition mode from infinite to Time Indicator and set the value to 15 seconds (or a time value you feel that’s appropriate).
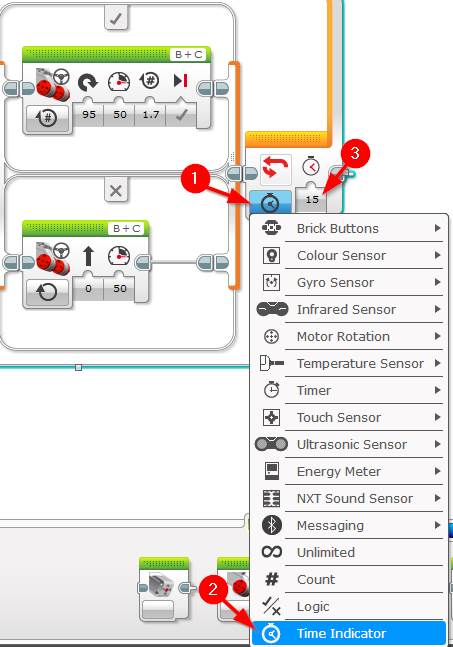
Congratulations, the program is now ready to test! Point your EV3 robot toward a wall (or large object) and hit the Download and Run button. The robot should now turn when it detects an object is close.
Tip: You may need to tweak the Switch block’s value to fit your robot and conditions.
Feel free to leave a comment to let us know how you go.


